
The longevity and beauty of kitchen worktops hinge on proper maintenance, with oiling being a quintessential part of this care. This guide provides a thorough walkthrough of oiling wooden worktops, an essential practice to protect and enhance the wood’s natural grain while ensuring durability.
Understanding the types of oils suited for different wood species, the preparation required before oiling, and the application technique are critical for achieving a functional and aesthetically pleasing surface. Whether it’s a seasoned antique oak or a contemporary beech countertop, this guide equips you with the knowledge to maintain your kitchen worktops in pristine condition, ensuring they remain a testament to both craftsmanship and the daily life they endure.
Real wood worktops add warmth and colour to a kitchen, yet they require regular treatment with oil to maintain their look. Applying an adequate coating will ensure that any liquid spilled onto the worktop beads up instead of sitting flat on its surface, keeping your worktop in great shape for years to come.
Treating wooden worktops requires applying several thin coats of oil, allowing each to dry for at least an hour between applications, to protect from rotting and warping as well as build resistance against stains and water damage. This will keep them looking their best while also offering resistance from water damage stains and staining.
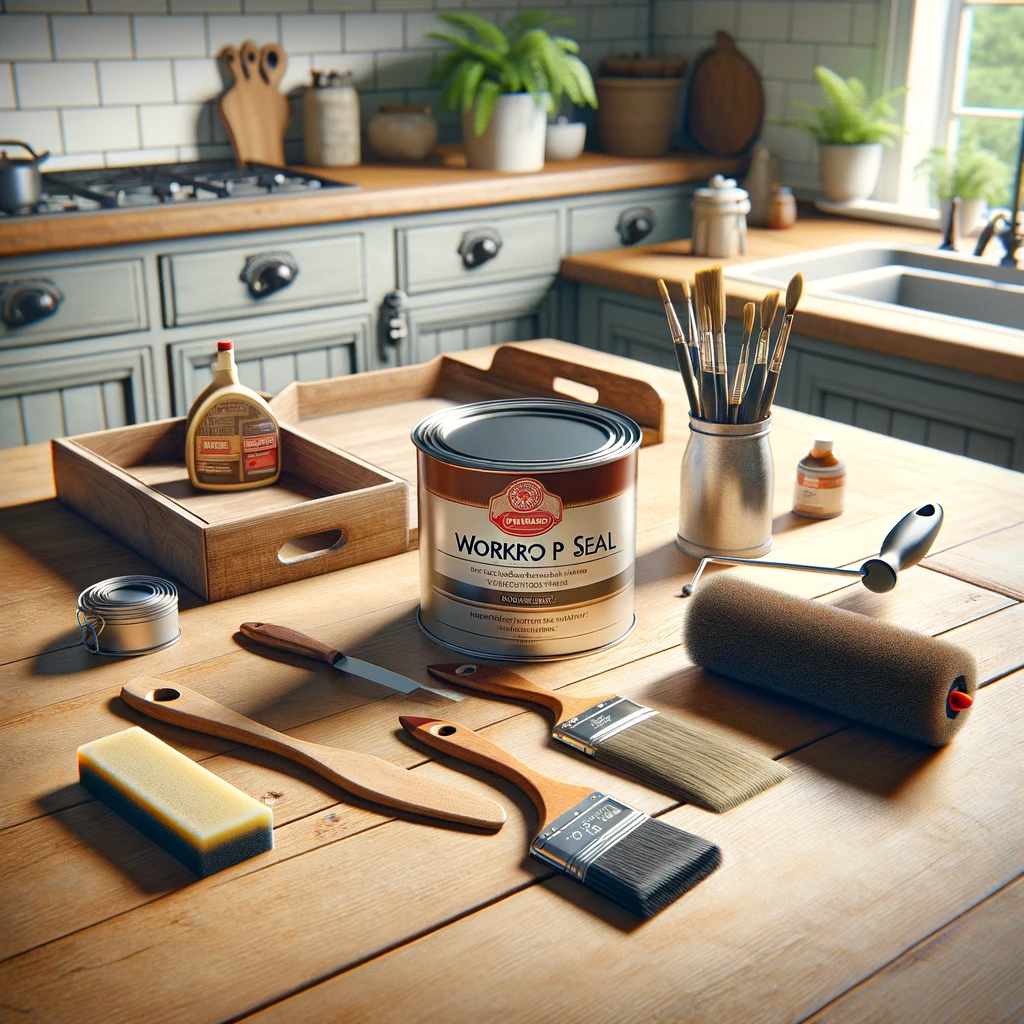
.This table serves as a structured guide for readers looking to care for their wooden kitchen worktops through the process of oiling. It outlines the critical steps and provides practical tips to ensure a successful application, helping maintain the durability and appearance of the wood.
| Step | Description | Tools & Materials Needed | Tips |
|---|---|---|---|
| 1. Preparation | Clear the worktop and clean the surface thoroughly. | Cleaning supplies, mild detergent, soft cloth. | Ensure the worktop is completely dry before proceeding. |
| 2. Sanding | Lightly sand the worktop to ensure a smooth surface. | Fine-grit sandpaper, sanding block, dust mask. | Sand in the direction of the wood grain to avoid scratches. |
| 3. Choosing Oil | Select a suitable oil for your worktop material. | Food-safe oil (e.g., linseed, tung, or mineral oil). | Consider the type of wood and usage of the worktop when choosing an oil. |
| 4. First Coat | Apply a thin, even first coat of oil with a cloth. | Soft lint-free cloth, gloves, wood oil. | Work in small sections, maintaining a consistent layer of oil. |
| 5. Drying | Allow the oil to penetrate and dry on the wood surface. | Timer or clock. | Follow the oil manufacturer’s recommended drying time, usually a few hours. |
| 6. Buffing | After the oil has dried, buff the worktop to remove excess oil. | Clean, dry cloth. | Buffing enhances the sheen and ensures a smooth finish. |
| 7. Additional Coats | Apply subsequent coats as necessary, allowing for drying time between each. | Soft cloth, wood oil. | Typically, 2-3 coats are sufficient, but some woods may require more. |
| 8. Final Buff | Perform a final buff to ensure an even, polished finish. | Clean, dry cloth. | A final buff will bring out the wood’s natural beauty and provide protection. |
| 9. Maintenance | Regularly clean, wash thoroughly and re-oil the worktop to maintain its condition. | Cleaning supplies, wood oil. | Oiling frequency depends on usage but generally 2-3 times a year. |
Worktop oils made of natural substances give wood an authentic appearance while offering maximum protection from wear and tear. Boiled linseed oil and Danish oil (which contains tung oil along with other additives that ease application and drying processes) are two such examples that are well suited for kitchen worktops.
Pour a small amount of oil onto the worktop and apply it with a clean, dry, lint-free cloth in the direction of the grain. Apply additional coats around taps and areas with heavy use, like draining boards; wooden surfaces absorb oil at different rates in different parts of the worktop so some parts might appear uneven after 10 minutes; continue repeating this step until your worktop feels glossy but is not swimming in oil, before leaving it to dry for several hours before returning it to use.
To keep your worktops looking their best, avoid cutting directly on them; always use a chopping board instead. Be especially wary when placing hot pots and pans onto them without trivets or surface protectors to avoid scorch marks on wood surfaces; additionally, take great caution with pigmented spices like turmeric, which could potentially stain wood surfaces if dropped directly on them. Re-oil worktops every three months to protect their appearance.
Regularly protect solid wood worktops with oil to ward off moisture and bacteria from entering gaps in their grain. Applying thin coats of oil is all it takes; just ensure each application is complete before moving onto the next.
Before beginning oiling, clean the surface by wiping down to remove dust or dirt. Pour a small amount of oil onto the surface and rub it in using a lint-free cloth until you have covered all spots; this process may take up to an hour, depending on the temperature in the room. Finally, let it dry for at least 24 hours before using it again!
Once the woodworktop feels dry, apply another coat of oil, but this time with light strokes. Again, several thin coats rather than one thick application will prove more efficient; once dry, you can test if it is proper by dropping some water onto it. Your worktop has been properly oiled if it forms beads.
After your worktops have fully dried (this may take several hours), apply the second coat. Pour a small amount of oil directly onto the wood and use a lint-free cloth to spread it across its surface in an even coat, working it in against its grain direction and paying special attention to edges and sink areas where water may penetrate more readily.
Oil is a natural product that protects worktops against rotting and warping while also enriching their wood grain patterns. It makes an excellent alternative to varnishes or modern spray-on lacquers that give worktops a plastic sheen that does not fit with natural wood surfaces.
Tung oil from tung trees is combined with linseed oil obtained through steaming and crushing seeds, along with some additives to speed drying times. While mineral oils might offer some level of protection to wood surfaces, their polymerization does not result in polymeric coatings that polymerize on their own and thus fail to offer as much coverage or protection as either tung or linseed oils do.
Solid wood worktops require periodic sanding in order to restore them to their former glory. Sandpaper should be applied carefully, brushing each fibre-like grain until all knots have been cleared away; this will not only restore its aesthetic value but will also protect against further damage.
After sanding your worktop, it is essential to apply several thin coats of oil in order to keep its appearance at its best. Linseed or Danish oil may work, although for optimal results, it’s best to find one suitable for wood worktops. Please allow each coat up to an hour of drying time between applications.
Pouring some oil onto a lint-free cloth and spread it over your entire worktop evenly. Wipe away any excess and allow it to dry before repeating this step with another layer. When dry, rub down again using another lint-free cloth until all surfaces have an even coverage of oil.
After the last coat of oil has completely dried (a few hours later), perform a final, gentle hand sanding to achieve a smooth finish with a slight sheen and conceal any marks or scratches that may have occurred during application.
Use linseed or Danish oil, available from DIY stores, with a microfiber cloth for optimal results. Start by pouring some directly onto the worktop before spreading out using your cloth to spread a thin layer evenly across its entirety. Repeat this process until the worktop has an even coating of oil.
Linseed and Danish oils stand out from other oils such as olive and tung oil by actually drying rather than remaining sticky, providing extended protection from water ingress and food stains on wood surfaces.
If you have taken the time and effort to install a solid wood worktop in your kitchen, it is vitally important that it remain protected. Regular oiling will keep it looking and feeling as great as possible for years. However, to avoid bacteria buildup, it is necessary to regularly clean it with soapy water even after oiling it.

William writes about Scotland’s rich history, from ancient clans to modern cultural movements, exploring the country’s heritage and traditions.